Saturday, January 7, 2012

Pit Stain Prevention

SUCCESS!!!

I was very skeptical before I tried this--my husband, though perfect in almost every way, has armpit sweat that makes a huge fat man after a 10 mile run cringe.  His undershirts last maybe 8 months before they are horribly yellow and have that nasty deoderant-sheen caked on.  We've only been married for four years, so this last time when I purchased yet another set of new undershirts I decided that the carnage had to stop!  I gave this a shot and I am SHOCKED at how well it worked.  I have only applied the baby powder one time and it has been about 4 months!

Original Pin:

Tips/Thoughts:
  • I don't use bleach when I wash our whites...I maybe should, but I feel like we're hard enough on our clothes by just wearing them
  • I used Johnson & Johnson baby powder--just pure cornmeal
  • I only put the baby powder on the insides of the shirts--but I used quite a bit.
  • The baby powder will get everywhere--and it stays with your ironing board cover until you wash it.
  • My sister-in-law also has told me that you can use white Rit Dye to get rid of pit stains--I think I might try this on the "control test subject" shirt pictured below.
**No photoshop was used here...well, actually I cropped it, but that is all!**

Humm...I've really got to figure out how to get these pictures turned the right way...sorry!

Thursday, January 5, 2012

Frame for Front Door Wreath


SUCCESS!

This is so cute hanging on my door—I can’t tell you how much I like it!  I painted mine blue and it has been great—very versatile for different seasons & styles.

Original Pin:
I'm going to have to get back to you on this--I know it is somewhere on one of my boards, but I can't find it.  Clearly, I need a better system

Tips/Thoughts:
·        I purchased an old picture with a good frame at a thrift store—it was much cheaper than buying a new frame, even on clearance.  The picture was easy to remove with a screwdriver!
·        I used Krylon spray paint, but I think that I might need to go back and put a sealer on it (I like Krylon’s Acrylic spray as a sealer) because it is starting to make little blue marks on my front door
·        I had a little trouble getting the frame to hang straight on the door, because the wreath hanger needs to go right in the middle, but when I have things hanging on the frame, I want them in the middle too.  Problem solved by using two ribbons to suspend the ornaments/letter/whatever from.  I tried hanging my letter from the actual wreath hanger as well, but it looked odd to me to not have anything going over the top of the frame


Sidenote--those glittered teal ornaments are also handmade--I just used spray-on adhesive and then rolled them in glitter. 

Here are some pictures from this summer too--


Humm...not sure why they are sideways...did I mention that I'm new to this blogging thing??


Soap/Lotion Dispenser from a Mason Jar

SUCCESS!

I love the look of these sitting on my kitchen sink—I have one for soap and one for lotion and they work great!  I got my mason jars as a local antique store for about $6 each and the pumps are from Hobby Lobby at a whopping $2 each.  I probably didn’t save any money making my own dispensers, but I don’t think I could have bought these anywhere

Original Pin:

Tips/Thoughts:
·        One of my jars is clear and one has a blue-ish tint—if you look close you can see it, but when they are filled you can’t really tell.  I would say to not pay the extra for the blue mason jars-just get the clear ones
·        I used antique lids—they look cool, but there was no way to match the color to paint the pumps themselves—not really a huge deal, but just keep it in mind if you want the pump and the lid to all match.  Also, the antique lids are very thing—if I push too hard on the pump to get out the soap, some of the lids bend a little.  It is easy to straighten back up, but I’m a little worried that if it bends too many times it may break.
·        I used Goop to glue the washer and soap dispenser top onto the lid—so far it hasn’t leaked at all!
·        Next time I do this I will not be purchasing dispensers and bottles—I have tons of old ones laying around my house that will work just great—and be free!
·        You’ll need a metal bit to drill through the lid—however, the metal bit really doesn’t drill through the ceramic lining of the lid very well—I would suggest breaking the lining with a hammer first and then drilling through the metal

One for soap & one for lotion

My sweet hubby drilled the holes for me--he is SUCH a hunka hunka handyman!

 My lotion jar has a blue tint--but you really can't tell unless you're looking pretty hard--and even then only where the glass is thicker

 If I was smart, I would have taken this picture before I put the lotion in. Oh well.  I used a rubber washer from Wal-Mart--they only had pink, but you can't tell when the lid is screwed in (and you aren't looking at then inside)

Pant Hanger as a Ribbon Organizer

SUCCESS!

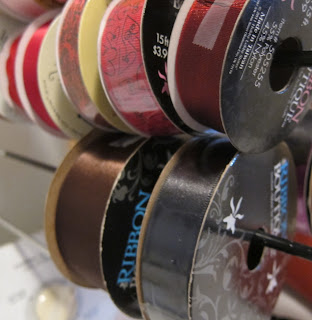
This is a great idea—why can’t I think of this stuff on my own?!??  I’m so glad that Pinterest can now function as the creative and organizational side of my brain!  I had a few of these pants hangers lying around needing a job and holding ribbon is the perfect task! 

Original Pin:

Tips/Thoughts:
·        I don’t think that the original pin had the ends of the ribbon taped back onto the roll, but I couldn’t handle all of the ends hanging free, it just looked too messy, so I taped them up
·        The value rolls are too large in diameter to hang on rods right next to each other—so if you have rolls of ribbon that are larger than about 3 ½”, you’ll need to plan on having an empty rod between them.  Most of the value rolls that you can get at Hobby Lobby are too large to hang right next to each other (check out the below picture)


A close up of the ribbons being too large to fit nicely next to each other.  This really isn't a big deal, except that then you can't unroll these ribbons very easily. 

 Okay, these are positioned a little better--see the empty rod between my small rolls and my big rolls?  One wasted rod, but for now, I don't need any more space! (knock on wood)

Homemade Samoa Bars

FAILURE

These really weren’t a total failure—in fact, they tasted great!  They just didn’t taste like Samoa’s.  I used extra chocolate chips, pecans, and coconut and it was delish.  I also drizzled some caramel over the top of part of the bars to see if it tasted more Samoa-y, which it didn't, but it was still WONDERFUL!

Original Pin:

Tips/Thoughts:
  • When I make these again, I think that I will probably layer a little differently—the condensed milk is really the glue that holds these bars together, but it was really hard (aka impossible) to spread on top of the chocolate chips and pecans.  I will put the condensed milk directly on the graham cracker crust so I can spread it, then the pecans and coconut with the chocolate chips on top (so they melt and hold the pecans and coconut on)
  • I made these before Christmas & sealed them in a tupperware in our fridge.  When I came back they were still good--I would put this shelf life (sealed & refrigerated) at about 3 weeks


Why yes, that is my fork in the corner there

Martha Stewart's Tub Scrub

SUCCESS!


We rent our current house and the previous renters apparently did not EVER wash the inside of their tub—NASTY.  (All of you people out there who don't scrub your tub, shame!  I know it isn't a really fun job, but HONESTLY.  Clean your tubs people!)  I have tried a multitude of cleaners to get the brown stains off of the bottom of our tub—Bleach, OxiClean, a Magic Eraser, Kaboob, you name it—nothing has worked.  UNTIL I tried Martha Stewart’s Tub Scrub from Pinterest!  THANK YOU PINTEREST for being the most AWESOME site EVER!  This worked like a charm—it was easy to make, didn’t even take much scrubbing, and rubbed the stains right off!  I will admit there are a few small spots still on the bottom, but it is SO much better—and I am ecstatic!  Check out the before and after pictures below—keep in mind that the before stains are AFTER all of the other failed cleaners.

Original Pin:

Tips/Thoughts:
·        I used tea-tree oil (purchased at Vitamin World for about $6—the lady there also told me it was a great disinfectant if you put a few drops in a tub of water to soak scrapes/ect). 
·        I followed the measurements on Martha’s recipe exactly, and it made enough to scrub 2 tubs and there was still probably enough for ½ a tub left over.  I stored the rest—I’ll let you know if it is still good after storage!
·        Our tub is not porcelin—not sure what it is called, but it is an all-in-one unit that fits into the wall & is some type of plastic

Not sure why I didn't take these at the same angle, but oh well


And now, a close-up of the scuz
AH-mazing.  Just amazing--I will never use another tub scrub again.  AND, never fear anyone who rents this house after us, I WILL keep our tub from EVER getting this nasty again.